Green concealer can look a little intimidating the first time you see it. After all, putting green makeup on your face doesn’t exactly sound like the most obvious route to a natural-looking complexion.
But once I understood what green concealer is actually used for, it made a lot more sense.
Green concealer is a color-correcting product designed to neutralize redness. I find it especially useful around red blemishes, the sides of the nose, areas of irritation and patches of facial redness that still show through regular foundation.
The trick is using a very small amount.
Green concealer should normally disappear beneath your foundation rather than leaving you looking green.
When it is applied correctly, it can make redness far easier to cover without piling on several layers of heavy foundation.
View more Make Up Tips >
In this guide, I’ll explain exactly how to use green concealer, when to apply it, whether it goes before or after foundation, and how I use it for everything from pimples to more widespread redness.
What Is Green Concealer Used For?
Green concealer is primarily used to disguise redness in the skin.
It works because green and red sit opposite each other on the traditional color wheel. Applying a small amount of green over a red area visually neutralizes some of that redness.
Instead of trying to cover vivid red skin with layer after layer of beige concealer, the green corrector tones the redness down first.
I find green concealer particularly useful for:
Red pimples and blemishes
Redness around the nose
Patches of facial redness
Acne marks that still look red
Mild irritation
Visible broken capillaries
Red areas associated with rosacea
The aim isn’t to turn the skin green. You’re simply using enough product to mute the red tone before applying your regular complexion makeup.
What Color Does Green Concealer Cover?
Green concealer covers or neutralizes red tones.
That means it is generally most useful when you’re dealing with areas that appear pink, scarlet or noticeably red.
It isn’t usually the best corrector for blue or purple under-eye circles, brown pigmentation or yellow discoloration.
Different correcting shades have different jobs.
Green is for redness.
Peach and orange tones are commonly used to counteract blue or purple discoloration, while purple or lavender correctors are often used to brighten areas that appear dull or yellow.
Once I started thinking of color correctors this way, they became much easier to understand.
Does Green Concealer Work?
Yes, green concealer can work very well when the redness is the right type and the product is applied sparingly.
What it doesn’t do is physically remove redness.
Instead, it changes how the color appears once makeup is applied over it.
I notice the biggest difference when I’m covering a very red blemish. If I apply ordinary concealer directly over the blemish, some of that red tone can still shine through.
A tiny amount of green underneath means I can often use much less regular concealer afterward.
The results are usually much more natural.
However, green concealer works best when you don’t overdo it. Too much can make the skin look grey, green or muddy once foundation is applied.
Think thin layers rather than full coverage.
When to Use Green Concealer
I use green concealer whenever redness is noticeable enough that ordinary foundation struggles to disguise it.
For example, I might use it when I have:
A particularly red spot
Redness beside my nostrils
A flushed patch on my cheeks
Residual redness from an old blemish
General redness in one part of my face
If my complexion only has very mild redness, I often skip the corrector altogether and simply use foundation.
Color correction is most useful when there is something specific that actually needs correcting.
Do You Apply Green Concealer Before or After Foundation?
In most cases, I apply green concealer before foundation.
My usual order is:
Skincare
Sunscreen
Primer, if I’m using one
Green color corrector
Foundation
Skin-toned concealer
Powder, if needed
Applying the green underneath foundation allows the foundation to soften and disguise the corrector.
If you apply green concealer on top of foundation, there’s a greater chance of being left with a visible green cast.
There can be exceptions, especially when doing very precise spot correction, but for everyday makeup I find green concealer before foundation is the easiest approach.
How to Use Green Concealer
The most important thing I’ve learned about how to use green concealer is this:
Use far less than you think you need.
You don’t need an opaque layer of green makeup.
You simply want enough to tone down the redness.
Here’s the basic method I use.
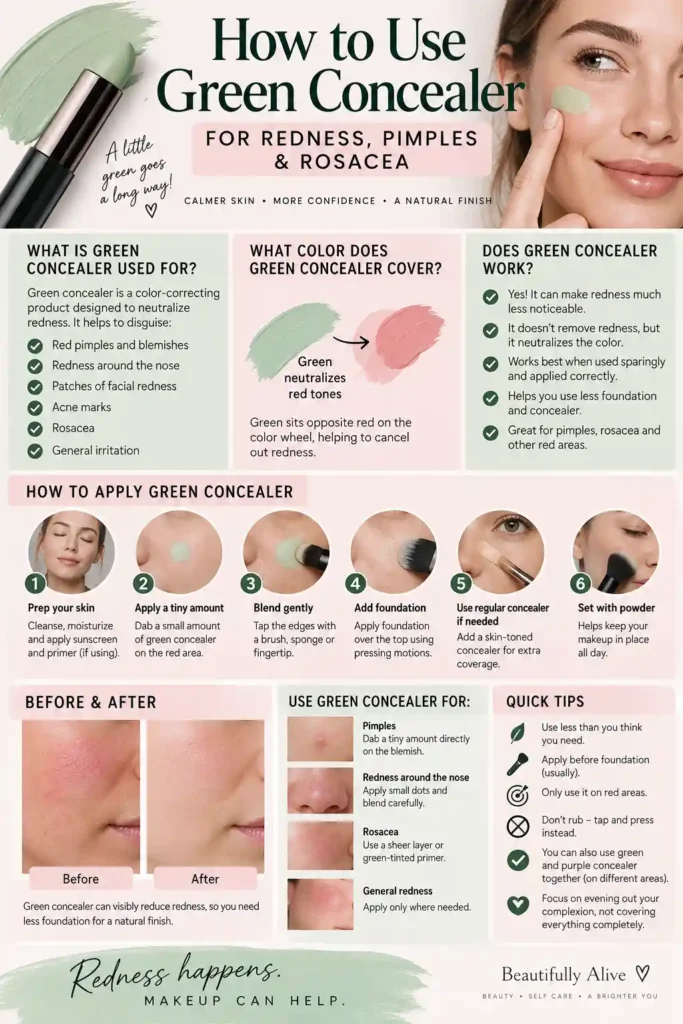
Step 1: Prepare Your Skin
I start with clean, moisturized skin.
Dry or flaky areas can make any concealer look patchy, so I give my moisturizer time to settle before applying makeup.
If I’m wearing sunscreen, that goes on before my makeup too.
Step 2: Identify the Red Areas
Rather than spreading green concealer everywhere, I look closely at where the redness actually is.
This might be around my nose, over an individual blemish or across part of my cheeks.
Step 3: Apply a Tiny Amount
I dab a very small amount of green corrector directly onto the red area.
I prefer starting with less because I can always add more.
Step 4: Blend the Edges
Using a fingertip, small brush or makeup sponge, I gently tap the product into place.
I don’t aggressively rub it into the skin.
Tapping helps keep the product over the area I’m trying to correct.
Step 5: Add Foundation
I then apply foundation over the top using gentle pressing or stippling motions.
This is important.
If I rub foundation backwards and forwards over the corrector, I may accidentally move the green product away from the area where I need it.
Step 6: Add Regular Concealer if Necessary
If the redness is still slightly visible, I use a small amount of normal skin-toned concealer.
At this stage, the area usually needs much less coverage because the green has already reduced the appearance of the redness.
How Do I Use Green Concealer Without Looking Green?
This is probably the biggest concern people have when trying color correction for the first time.
The answer is simply to apply less product.
If I can clearly see a thick, mint-green patch on my skin after blending, I’ve probably used too much.
A correctly applied green corrector may still be slightly visible before foundation, but it shouldn’t resemble green face paint.
I also find that choosing the right shade helps.
Very pale skin may suit a lighter, softer mint-green corrector, while deeper complexions may benefit from a richer correcting tone.
The intensity of the green should suit both your complexion and the intensity of the redness you’re trying to disguise.
How to Apply Green Concealer for Redness
For general facial redness, I prefer using an extremely thin layer.
Putting lots of corrector across a large area can easily make foundation look heavy.
I usually place a few tiny dots of green corrector over the reddest areas and blend them outward.
Then I look at my skin again.
If the redness has softened, that’s enough.
I don’t try to completely erase every trace of pink before applying foundation.
Foundation will do the rest of the work.
Another option is a green-tinted primer. These products tend to be sheerer than concentrated concealers and can be easier to use when redness affects a larger area.
How to Cover Pimples With Green Concealer
Green concealer is particularly useful for bright red pimples.
Here’s how I use it.
First, I apply the tiniest dot of green corrector directly onto the red part of the blemish.
Then I gently tap it into place with a small concealer brush or clean fingertip.
I try not to spread the corrector far beyond the blemish because the surrounding skin doesn’t need color correction.
Next, I apply foundation.
Finally, if I still need extra coverage, I tap a skin-toned concealer over the spot.
I avoid rubbing because that can remove both the green corrector and the foundation underneath.
A tiny amount of translucent powder can help keep everything in place.
One thing green concealer cannot disguise particularly well is texture.
It can help neutralize redness, but a raised blemish will still have some visible texture. Using thick layers of makeup often makes that texture more obvious rather than less noticeable.
How to Use Green Concealer for Rosacea
Green concealer can be useful for reducing the appearance of redness associated with rosacea, although it doesn’t treat rosacea itself.
Because rosacea-prone skin may also be sensitive, I prefer to keep the makeup routine as simple and gentle as possible.
Rather than applying a thick layer of corrector, I would start with a sheer green product over the areas where redness is strongest.
A green primer can sometimes be easier to use across larger areas such as the cheeks.
I would then apply foundation by gently pressing it onto the skin instead of rubbing.
Look for complexion products that suit sensitive skin, and stop using anything that causes burning, itching or increased irritation.
Persistent or worsening facial redness is something to discuss with a healthcare professional or dermatologist, particularly if you haven’t previously been diagnosed with rosacea.
Green Concealer Before and After: What Difference Should You Expect?
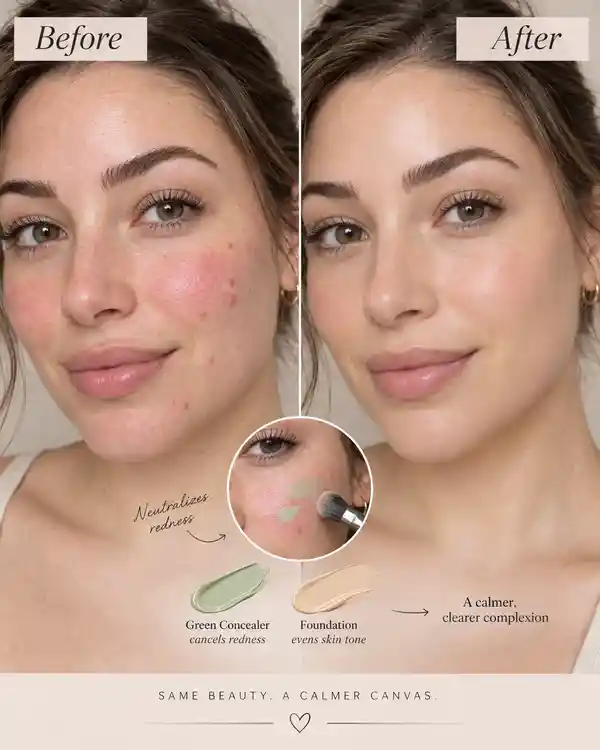
The difference green concealer makes can actually be fairly subtle before foundation goes on.
Before using it, a blemish might appear intensely red.
After applying a small amount of green corrector, that red area may look more muted or slightly neutralized.
Once foundation is applied over the top, the difference becomes much more noticeable.
Instead of needing several layers of foundation or concealer, I can often achieve the same result with far less product.
The finished makeup usually looks more even and less cakey.
The ideal green concealer before-and-after result isn’t dramatic green coverage.
It’s simply less visible redness after your foundation is applied.
How to Apply Green Concealer Around the Nose
Redness around the nose is incredibly common, and this is one of my favorite places to use green corrector.
I normally put one tiny dot beside each nostril where the redness is strongest.
Then I blend carefully with a small brush.
Because makeup can gather around the nose, I keep the layers very thin.
After foundation, I may press a small amount of powder around the area to stop the makeup disappearing during the day.
How to Use Green and Purple Concealer
Green and purple concealers have completely different jobs.
I use:
Green concealer for red areas.
Purple or lavender concealer for dull or yellow-looking areas.
For example, I might use green around a red blemish and lavender very lightly on an area of my complexion that looks sallow.
However, I wouldn’t normally layer the two colors directly on top of each other.
Too many color correctors can quickly leave the complexion looking muddy.
Instead, I apply each shade only where it’s actually needed and then use foundation to bring everything together.
Liquid, Cream or Stick Green Concealer?
Green concealers come in several formats.
Liquid Green Corrector
Liquid formulas are often easy to blend and work well when I only need a light amount of correction.
They’re particularly useful for beginners.
Cream Green Concealer
Cream formulas usually provide stronger coverage.
I like these for individual blemishes because I can apply them very precisely.
Green Concealer Stick
Stick correctors are convenient and portable.
However, some formulas can be quite opaque, so I make sure not to draw thick green lines directly onto my face.
Green Primer
A green primer is different from a concentrated concealer.
It provides much sheerer color correction and can be useful when redness affects a larger portion of the face.
View Green Concealer Options on Amazon.com
Should I Blend Green Concealer With My Fingers, a Brush or a Sponge?
All three methods can work.
For individual pimples, I like a small concealer brush because it lets me place the product exactly where I need it.
For larger patches of redness, a damp makeup sponge can create a very sheer finish.
My fingers also work perfectly well, particularly with creamy formulas. The warmth from my fingertips can help soften the product.
Whatever method I use, I tap rather than rub.
Can You Mix Green Concealer With Foundation?
You can, but I generally prefer applying them separately.
Mixing a tiny amount of green corrector into foundation can sometimes help tone down widespread redness, but it’s easy to add too much and alter the foundation shade.
Using a green primer underneath foundation usually gives me more control.
For individual spots, I always apply the green corrector directly to the blemish rather than mixing it into foundation.
Can You Wear Green Concealer Without Foundation?
Technically yes, but it depends on the product.
Most concentrated green concealers are designed to be covered with foundation or skin-toned concealer.
Otherwise the green pigment may remain visible.
Sheer green primers and tinted complexion products are different. Some are subtle enough to wear under a light tinted moisturizer.
For a natural no-foundation look, I usually apply green corrector only to individual red spots and then cover those areas with a tiny amount of skin-toned concealer.
Common Green Concealer Mistakes
Green concealer is quite forgiving once you get used to it, but there are a few mistakes I try to avoid.
Using Too Much
This is the biggest one.
A thick layer of green corrector can make your foundation look dull, grey or slightly green.
Applying It Everywhere
Not every part of your face needs correcting.
I only apply green where redness actually exists.
Rubbing Foundation Over It
Heavy blending can move the corrector around.
Pressing foundation over the area usually works better.
Trying to Cover Texture
Color correction changes the appearance of color, not texture.
It can disguise the redness of a pimple but won’t make a raised blemish completely disappear.
Using the Wrong Correcting Color
Green isn’t an all-purpose concealer.
If the discoloration is blue, purple or brown rather than red, another correcting shade may work better.
How Much Green Concealer Should I Use?
Usually far less than you would use with regular concealer.
For a single pimple, I may use an amount no larger than the tip of a pin.
For redness around my nose, one or two tiny dots are often enough.
For larger areas, I would rather use several very sheer dots than one thick layer.
I can always add more.
Removing excess corrector after applying foundation is much harder.
Green Concealer FAQs
1. What is green concealer used for?
Green concealer is used to neutralize the appearance of red tones in the skin, including blemishes, redness around the nose and other localized red areas.
2. What color does green concealer cover?
Green concealer is primarily used to cover or neutralize redness.
3. How do I use green concealer?
Apply a very small amount directly to red areas, gently blend the edges and then apply your normal foundation over the top.
4. Do I apply green concealer before or after foundation?
Green concealer is usually applied before foundation so the foundation can cover the green pigment while leaving the redness neutralized underneath.
5. How do I apply green concealer for redness?
Apply tiny dots only where the redness is strongest, blend gently and cover with foundation. Avoid applying a thick green layer across the whole face.
4. Does green concealer work on pimples?
Yes. It can be especially useful for neutralizing the redness surrounding inflamed-looking blemishes.
5. How do you cover pimples with green concealer?
Place a very small amount directly over the red part of the blemish, blend lightly, apply foundation and then add a skin-toned concealer if additional coverage is needed.
6. Can green concealer hide acne?
It can help disguise the redness associated with acne, but it cannot hide raised texture or treat the underlying acne.
7. Can I use green concealer for rosacea?
Green color correctors can help reduce the visible appearance of facial redness associated with rosacea. However, makeup doesn’t treat rosacea itself, and sensitive or irritated skin may require specially formulated products.
8. Can green concealer cover dark circles?
Usually not. Under-eye circles often contain blue or purple tones, which are typically better corrected with peach, salmon or orange shades depending on skin tone.
9. Can I use green concealer around my nose?
Yes. Redness around the sides of the nose is one of the areas where green concealer can be particularly helpful.
10. Should green concealer completely cover redness?
Not necessarily. You only need to tone the redness down enough that your normal foundation or concealer can finish the job.
11. Why does my green concealer look grey under foundation?
You may be using too much product or a green shade that is too strong for your complexion.
12. Can you use green and purple concealer together?
Yes, but use them on different areas. Green corrects red tones, while purple or lavender correctors are commonly used to brighten dull or yellow-looking areas.
13. Is green concealer suitable for everyday makeup?
Absolutely. I just keep it targeted. A tiny amount around my nose or on an occasional blemish can make a surprising difference without adding much extra time to my routine.
Final Thoughts
Green concealer sounds much stranger than it actually is.
Once I stopped thinking of it as a normal concealer and started treating it as a color-correcting step, it became much easier to use.
The key is restraint.
I apply the smallest possible amount directly over redness, gently blend it and then let my foundation do the rest.
For red pimples, redness around the nose and patches of facial redness, it can dramatically reduce how much conventional concealer I need.
And that’s really the goal.
Good color correction shouldn’t leave anyone wondering why you’ve put green makeup on your face.
It should simply make your finished complexion look more even, while allowing you to use less makeup rather than more.